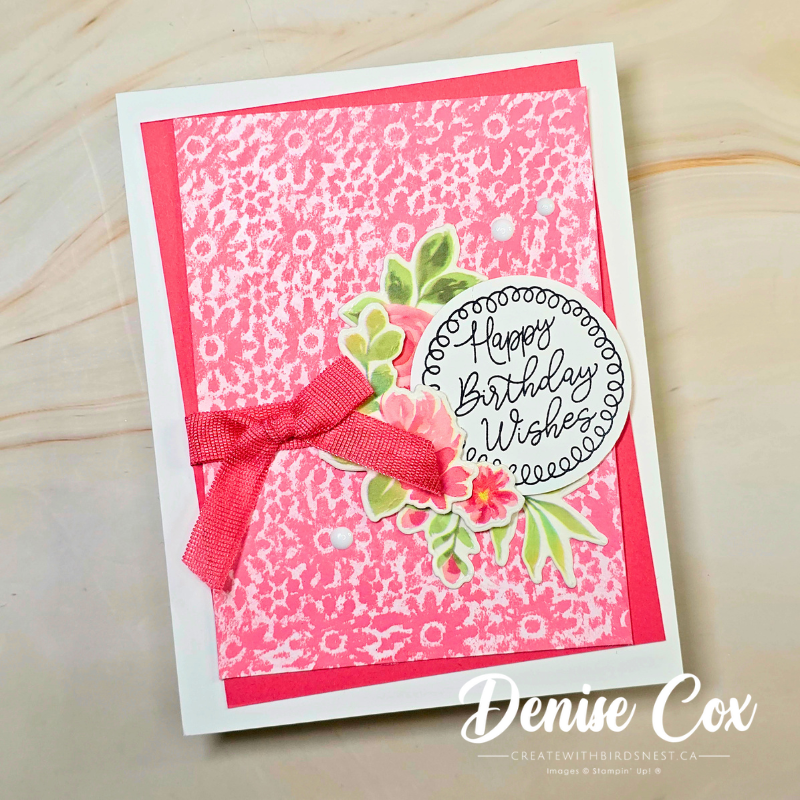
Crayon Wash Technique Birthday Card
This week’s project is all about pulling something unexpected from your stash… a crayon!
The crayon wash technique is simple, a little bit magical, and honestly just really fun to watch come together. If you’ve got a white crayon tucked away somewhere, you’re ready to give this a try.
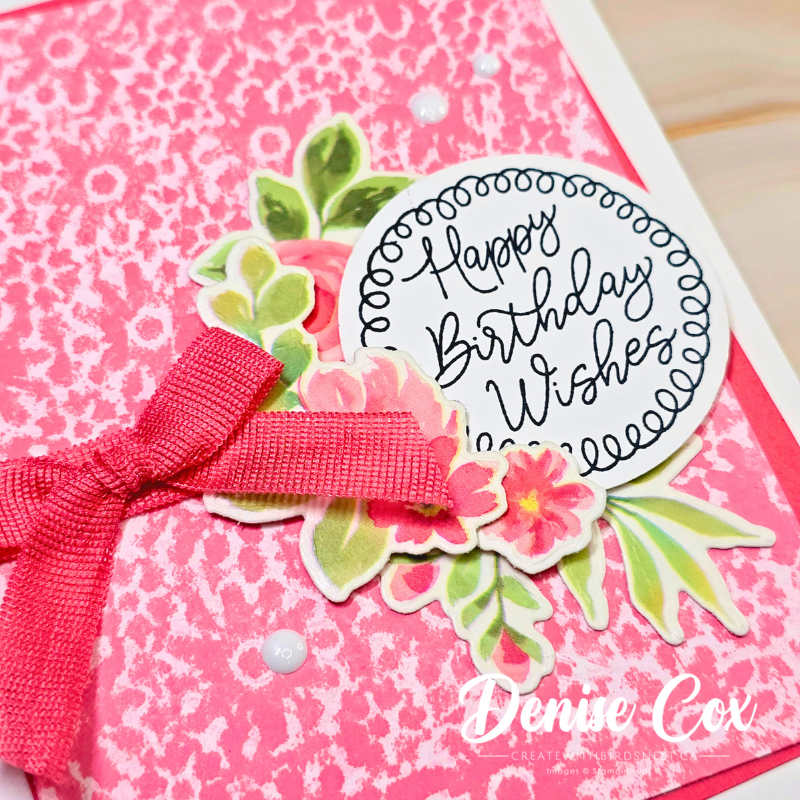
I paired it with some soft florals, a sweet birthday sentiment, and a pop of ribbon for a card that feels bright, happy, and full of texture.
Watch the Video Tutorial
You can watch the full step-by-step here:
Quick Project Notes
- Use a white crayon + embossing folder to create the resist pattern
- Add ink with a water painter and watch the design appear
- Try covering the whole panel or just sections for different looks
- Washi tape + dies = instant, no-fuss embellishments
- Don’t forget a little bling and a bow… it finishes everything off
Measurements
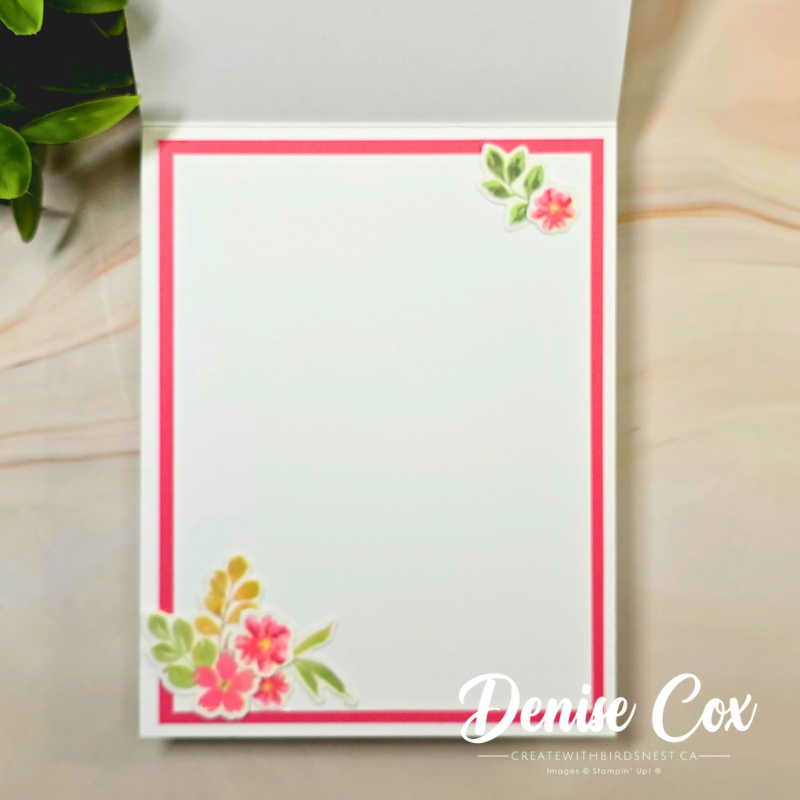
- Basic White Card Base: 4 1/4″ x 11″ (scored at 5 1/2″)
- Strawberry Slush Layer: 3 3/4″ x 5″
- Crayon Wash Panel: 3 1/2″ x 4 3/4″
- Inside Layer (Strawberry Slush): 4″ x 5 1/4″
- Inside Basic White: 3 3/4″ x 5″
- Scrap Basic White: for sentiment + die cutting
A Little Creative Nudge
If you haven’t reached for something like crayons in a while… this is your sign.
This is one of those techniques that reminds you crafting doesn’t have to be complicated to be beautiful. Just simple supplies, a bit of curiosity, and letting yourself play.
Stay Connected
💌 Join my email list (and get a FREE tutorial!)
https://createwithbirdsnest.ca/subscribe/
📺 Subscribe on YouTube for weekly crafting videos
https://www.youtube.com/c/BirdsnestDesigns
![Lazy Daisy 3 D Embossing Folder [ 167196 ]](https://assets1.tamsnetwork.com/images/EC042017NF/167196s.jpg "Lazy Daisy 3 D Embossing Folder [ 167196 ]")
![Encircled With Love Photopolymer Stamp Set (English) [ 169090 ]](https://assets1.tamsnetwork.com/images/EC042017NF/169090s.jpg "Encircled With Love Photopolymer Stamp Set (English) [ 169090 ]")
![1 7/8" (4.8 Cm) Circle Punch [ 165259 ]](https://assets1.tamsnetwork.com/images/EC042017NF/165259s.jpg "1 7/8\" (4.8 Cm) Circle Punch [ 165259 ]")
![Extraordinary Flora Washi Tape [ 165269 ]](https://assets1.tamsnetwork.com/images/EC042017NF/165269s.jpg "Extraordinary Flora Washi Tape [ 165269 ]")
![Extraordinary Flora Die [ 165244 ]](https://assets1.tamsnetwork.com/images/EC042017NF/165244s.jpg "Extraordinary Flora Die [ 165244 ]")
![Water Painters [ 168253 ]](https://assets1.tamsnetwork.com/images/EC042017NF/168253s.jpg "Water Painters [ 168253 ]")
![Moody Palette Glossy Dots [ 167180 ]](https://assets1.tamsnetwork.com/images/EC042017NF/167180s.jpg "Moody Palette Glossy Dots [ 167180 ]")
![Strawberry Slush 3/8" (1 Cm) Faux Linen Ribbon [ 165274 ]](https://assets1.tamsnetwork.com/images/EC042017NF/165274s.jpg "Strawberry Slush 3/8\" (1 Cm) Faux Linen Ribbon [ 165274 ]")
![Strawberry Slush Classic Stampin' Ink Refill [ 165282 ]](https://assets1.tamsnetwork.com/images/EC042017NF/165282s.jpg "Strawberry Slush Classic Stampin' Ink Refill [ 165282 ]")
![Strawberry Slush 8 1/2" X 11" Cardstock [ 165625 ]](https://assets1.tamsnetwork.com/images/EC042017NF/165625s.jpg "Strawberry Slush 8 1/2\" X 11\" Cardstock [ 165625 ]")
![Secret Sea Classic Stampin' Pad [ 165285 ]](https://assets1.tamsnetwork.com/images/EC042017NF/165285s.jpg "Secret Sea Classic Stampin' Pad [ 165285 ]")
![Basic White 8 1/2" X 11" Thick Cardstock [ 159229 ]](https://assets1.tamsnetwork.com/images/EC042017NF/159229s.jpg "Basic White 8 1/2\" X 11\" Thick Cardstock [ 159229 ]")
I have been using this crayon technique for a while and LOVE it. Thanks for sharing.