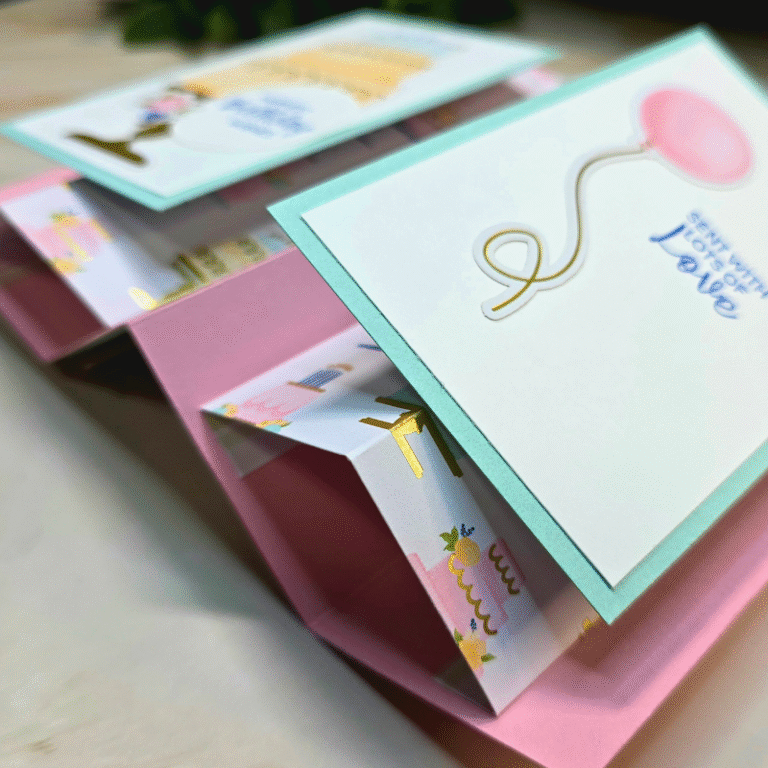
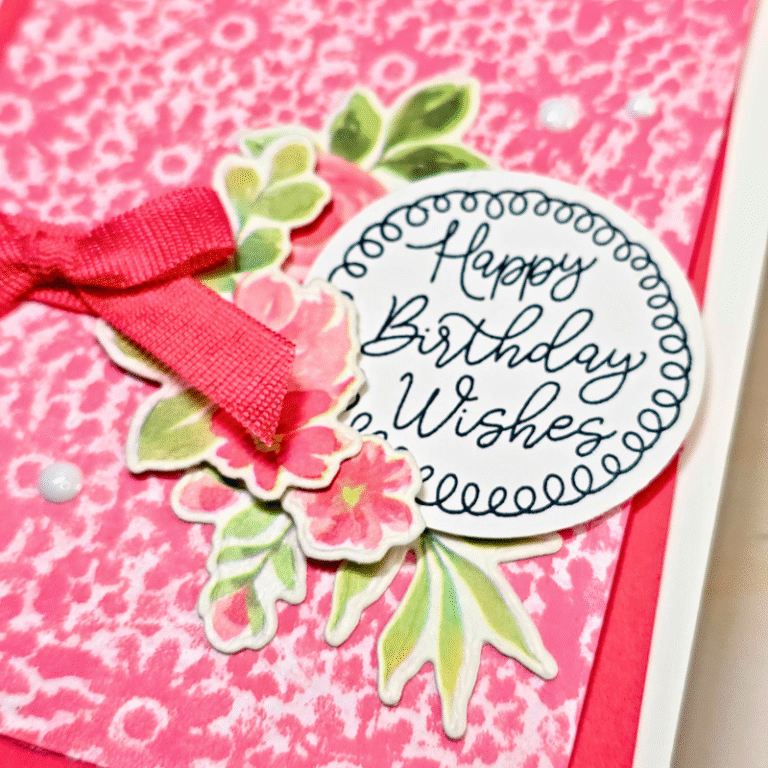
Hello and welcome, it’s so nice to see you! Today I am sharing the quick & easy Easter Bunny treat container we created during my Tutorial Tuesday Facebook Live last night. I am featuring the Easter Bunny stamp set all week long here on my blog. Have you added this cute as a button stamp to your collection yet? Click HERE to add it to your order today and you will be set to create adorable Easter and Springtime crafts for days!
If you would like to create this quick & easy treat container, scroll on down to the Let’s Make It section of this post. Click the play button to watch the tutorial replay. Measurements and cutting guide are all mentioned in the video. At the end of this post you will also find a visual list of all of the Stampin’ Up! supplies used to create this fun Easter Bunny treat container. Simply click on any of the images to view them closer or purchase them from my online store. Remember to use the current February 2023 host code (KF2EWNAJ) when you order online to earn customer loyalty tokens on your order!
Thanks for stopping by ❤️ … have a fabulous day and Happy Stamping!
Let’s Make It!
Below is the video replay of the Facebook Live to create this card. If you like the video please subscribe to my YouTube Channel and leave me a comment. I love to hear from you!
Stampin’ Up! products I used on today’s card
You can purchase Stampin’ Up! products from my online store from anywhere in Canada, I would love to have you shop with me! To see more details of any of the products in this list just click on the image!
Earn customer loyalty tokens for each $10 increment of your online order … collect and redeem for free Stampin’ Up! product!! If you have any questions about ordering or need a little help to place your order please contact me … I am happy to help!
Hello and happy Monday! This week I have chosen the Stampin’ Up! Easter Bunny bundle to be my featured product of the week. Let’s kick it off with a fun fold!
As of this morning this adorable bundle was on the low inventory list. So if you are wanting to add this to your collection in time for Easter I wouldn’t wait too long, it could be sold out very quickly. To purchase it through my online store now just click HERE.
This adorable Easter Bunny Z-Fold card is on of the three cards that we will be making together in my Happy Hostess monthly club. I just love how cute and adorable these Easter Bunnies are. Of course they make great Easter cards but they would also make for some great spring themed cards too! I can even visualize some pretty spectacular scrapbook pages made with this fun bundle! For today’s card I have paired it with the sale-a-bration exclusive Dandy Designs Designer Series Paper (Free with $120 CDN order). If you would like to make this card for yourself, I have all of the directions and measurements in the Let’s Make It section below. Have fun and Happy Stamping!
Let’s Make It!
To create the card base cut Fresh Freesia cardstock 8-1/2 x 5-1/2 and score at 2-1/8 and 4-1/4
Fold the Fresh Freesia card base in half on the 4-1/4 score line and fold back on the 2-1/8 score line to create a z-fold
Open the card and adhere the two strips of 1-7/8 x 5-1/4 Dandy Designs DSP to each of the smaller panels
Stamp the front facing bunny with Basic Gray ink in the bottom left corner of the Basic White 4 x 5-1/4 insert, colour with Stampin’ Blends and adhere to the inside of the card
Emboss the 2-3/4 x 3-3/4 piece of Basic White with the Raindrops folder and layer on to the Fresh Freesia cardstock. Attach this piece to the Pear Pizzazz cardstock with stampin’ dimensionals
With adhesive just along the left hand side attach the Pear Pizzazz cardstock to the folded card front
Stamp the grass all along the bottom of the 3/4 strip of Pear Pizzazz cardstock with Old Olive ink and fussy cut along the top – adhere to the bottom of the raindrop embossed piece with dimensionals
On the 2-1/2 x 3-1/2 Basic White stamp the right-facing bunny and easter eggs with Basic Gray ink, fussy cut the easter eggs and punch the bunny out with the coordinating Easter Bunny punch
Colour the images and attach to the card front with stampin’ dimensionals
Make a pointed end on the 3/4 strip of Basic White using the Banners Pick-a-Punch, stamp Happy Easter with Basic Gray and attach above the bunny with dimensionals – add a Milky Dot at the pointed end
Stampin’ Up! Products Used For The On The Farm Notecards
You can purchase Stampin’ Up! products from my online store from anywhere in Canada, I would love to have you shop with me! To see more details of any of the products in this list just click on the image!
Earn customer loyalty tokens for each $10 increment of your online order … collect and redeem for free Stampin’ Up! product!! If you have any questions about ordering or need a little help to place your order please contact me … I am happy to help!
Hello and welcome Stampin’ Friends! Today I want to share with you the great fun fold card that I created during my Tutorial Tuesday Facebook Live last night. I am featuring the On The Farm bundle and Day At The Farm Designer Series Paper all week long here on the blog. Have you added this adorable bundle to your collection yet? Click HERE to add it to your order today … you will be so happy that you did! Plus when you order this bundle you can chose the Day At The Farm Designer Series Paper as your FREE sale-a-bration product!
If you would like to create this fun fold On The Farm card yourself just scroll on down to the Let’s Make It section of this post. Click the play button to watch the tutorial replay. Measurements and cutting guide are all mentioned in the video. At the end of this post you will also find a visual list of all of the Stampin’ Up! supplies used to create this On The Farm card. Simply click on any of the images to view them closer or purchase them from my online store. Remember to use the current host code (KF2EWNAJ) when you order online to earn customer loyalty tokens on your order!
Thanks for popping in, have a fabulous day and Happy Stamping!
Let’s Make It!
Below is the video replay of the Facebook Live to create this card. If you like the video please subscribe to my YouTube Channel and leave me a comment. I love to hear from you!
Stampin’ Up! products I used on today’s card
You can purchase Stampin’ Up! products from my online store from anywhere in Canada, I would love to have you shop with me! To see more details of any of the products in this list just click on the image!
Earn customer loyalty tokens for each $10 increment of your online order … collect and redeem for free Stampin’ Up! product!! If you have any questions about ordering or need a little help to place your order please contact me … I am happy to help!
Hello Stampin’ Friends! Today I am kicking off the week with a brand new product feature! This week I have chosen to showcase the fun On The Farm bundle and the coordinating Day At The Farm, sale-a-bration exclusive, Designer Series Paper. The coordination of these products is perfect and makes creating these farm themed projects even more enjoyable!
To create these adorable projects I started with a package of the Basic White Note Cards & Envelopes. Then I pulled out a few of my favourite patterns from the Day At The Farm Designer Series Paper and started brainstorming ideas. I wanted to add a few sentiments that were not available in the On The Farm stamp set so I opted to use some from the Inspired Thoughts set. I like the greetings in this set and the simple font mixes well with the farm theme for these cards.
Making these little note cards was a lot of fun because I was able to easily combine some stamped images with the patterned papers to create scenes of being out on a farm! Using the On The Farm dies to cut out both the stamped images and some directly from the Designer Series Paper made it simple to create layers by popping these images up with stampin’ dimensionals. There are close up photos of each of the four cards I have created so you can take a closer look if you wanted to recreate them yourself.
Now… let’s talk about how you can get the Day At The Farm Designer Series Paper in your collection for FREE!! During the Stampin’ Up! Sale-A-Bration promotion (Jan 5 – Feb 28) when you spend $60 you can chose to receive this paper collection as your free gift with purchase! The On The Farm bundle (stamp set and dies) is perfectly priced at $70 so when you buy the bundle you can get the coordinating paper pack free. Visit my online store to place your order, earn some free product and collect my Customer Loyalty Tokens too!
I hope that you like these simple projects that I have shared with you today! If you like the On The Farm bundle be sure to pop back in on Wednesday to see the fabulous fun-fold card I will be sharing. You don’t want to miss it ?.
Thanks for stopping in! Have a wonderful week.
Stampin’ Up! Products Used For The On The Farm Notecards
You can purchase Stampin’ Up! products from my online store from anywhere in Canada, I would love to have you shop with me! To see more details of any of the products in this list just click on the image!
Earn customer loyalty tokens for each $10 increment of your online order … collect and redeem for free Stampin’ Up! product!! If you have any questions about ordering or need a little help to place your order please contact me … I am happy to help!
Welcome, it is so nice to see you! Today I have the final Taco Fiesta project to share with you for this week. This stamp set has been a fun one to create with and makes such adorable cards, I hope that I have inspired you to take a closer look at this set if it isn’t already on your wish list or in your collection ?.
If you have fallen in love with the Taco Fiesta stamp set and want to create six adorable projects with it, then you will definitely want to register for the February Handmade @ Home Class Kit. To register and find all of the information just CLICK HERE!! The last day to register is February 1st. The cards that I have shared on my blog this week are not any of the cards in the Handmade @ Home class kit.
If you would like to recreate today’s Taco Fiesta card for yourself just scroll on down to the Let’s Make It section of this post. I have included the measurements and step-by-step instructions for you. I have also included a complete supply list at the end of the post to make shopping for these supplies nice and easy for you!
Thanks for popping in, have a wonderful week and Happy Stamping!
Let’s Make It!
Start with a Thick Basic White card base 8-1/2 x 5-1/2 scored at 4-1/4
Add a 4 x 5-1/4 piece of Granny Apple Green cardstock to the card front
Cut a piece of Basic White to 3-3/4 x 5 and using Memento Black ink, stamp the tortilla chips and lime on the top 3″
Colour the stamped images with Stampin’ Blends: Granny Apple Green and So Saffron
Adhere a 2 x 3-3/4 strip of the striped Dandy Designs (sale-a-bration exclusive) Designer Series Paper to the bottom portion of the stamped piece, then attach to the card front
Using the Stylish Shapes dies cut a 2-1/8 stitched circle from Basic White and a 3/4 wide banner from So Saffron
Using Memento Black ink, stamp the sentiment on the banner close to the right end and attach to the card at the top of the Designer Series Paper
Attach the circle die cut to the left of the banner with stampin’ dimensionals
On a scrap piece of Basic White stamp, colour and cut out the following:
avocado topped with the sombrero with the mustache face
bowl of guacamole
lime
Add the avocado and the guacamole to the die cut circle and the lime below the banner using stampin’ dimensionals
To complete the card front, add a few Parakeet Party 2022-2024 In Color Dots
Don’t forget to show some love to the inside of the card too … check the photo below to see how I decorated the 4 x 5-1/4 insert for the inside of my sample card
Stampin’ Up! products I used on today’s Taco Fiesta card
You can purchase Stampin’ Up! products from my online store from anywhere in Canada, I would love to have you shop with me! To see more details of any of the products in this list just click on the image!
Earn customer loyalty tokens for each $10 increment of your online order … collect and redeem for free Stampin’ Up! product!! If you have any questions about ordering or need a little help to place your order please contact me … I am happy to help!
Hello Stampin’ Friends! Today I want to share with you the cute Taco Fiesta card that I created during my Tutorial Tuesday Facebook Live last night. I am featuring the Taco Fiesta stamp set all week long here on the blog. Have you added this fun & witty stamp set to your collection yet? Click HERE to add it to your order right away … you will be so happy that you did!
The Taco Fiesta stamp set is ideal for making cards for all sorts of occasions. It can easily be paired with so many other great Stampin’ Up! products to make the perfect card for your loved ones. For this card I paired the stamp set up with the Picture This dies from the Annual Catalogue. I just love the ‘windows’ that the negative image of the die creates. This fun set just screams to be used with bright & bold colours which is so refreshing during these cold and gloomy winter days. Daffodil Delight, Real Red and Old Olive are a classic combination and work perfectly for this fiesta themed card!
If you would like to recreate this fun Taco Fiesta card yourself just scroll on down to the Let’s Make It section of this post. Click the play button to watch the tutorial replay. I have also included the cardstock measurements for you. At the end of this post you will also find a visual list of all of the Stampin’ Up! supplies used to create this Taco Fiesta card. Simply click on any of the images to view them closer or purchase them from my online store. Remember to use the current host code (KF2EWNAJ) when you order online to earn customer loyalty tokens on your order!
If you like this Taco Fiesta stamp set and want to create 6 fabulous projects with it, then you will definitely want to register for the February Handmade @ Home Class Kit. To register and find all of the information just CLICK HERE!! The last day to register is February 1st.
Thanks for popping in, have a fabulous day and Happy Stamping!
Let’s Make It!
Below is the video replay of the Facebook Live to create this card. If you like the video please subscribe to my YouTube Channel and leave me a comment. I love to hear from you!
Cardstock Measurements:
Daffodil Delight card base 8-1/2 x 5-1/2″ scored in half at 4-1/4″
Basic White (2) 4 x 5-1/4″, 3-3/4 x 5 to die cut from, and scrap pieces for the stamping
Stampin’ Up! products I used on today’s card
You can purchase Stampin’ Up! products from my online store from anywhere in Canada, I would love to have you shop with me! To see more details of any of the products in this list just click on the image!
Earn customer loyalty tokens for each $10 increment of your online order … collect and redeem for free Stampin’ Up! product!! If you have any questions about ordering or need a little help to place your order please contact me … I am happy to help!