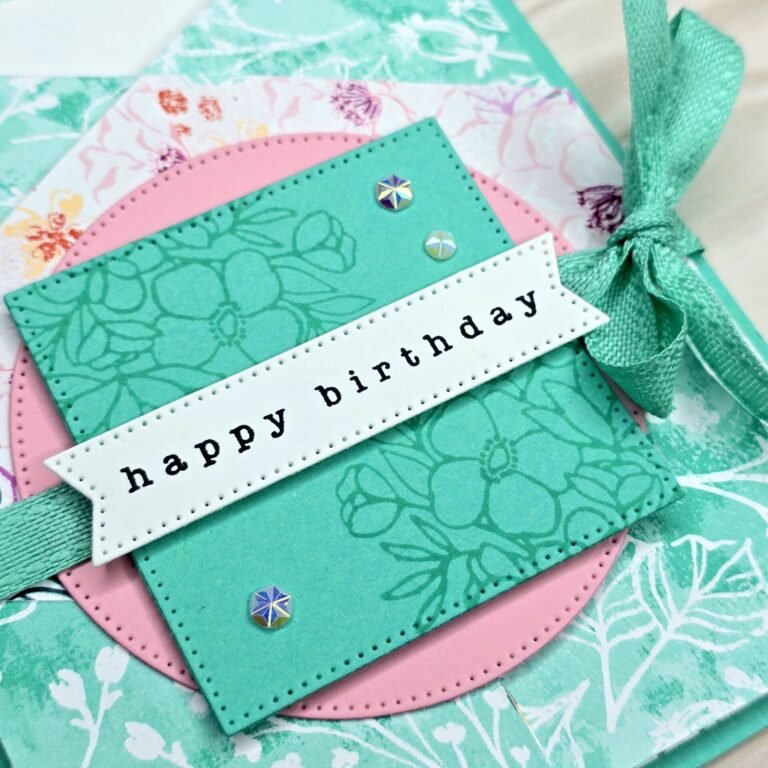
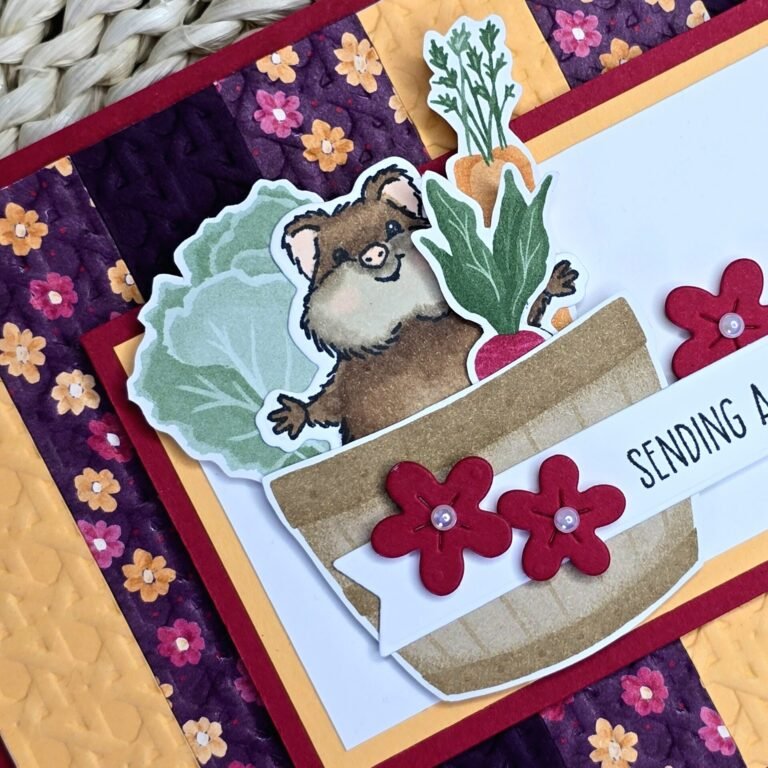
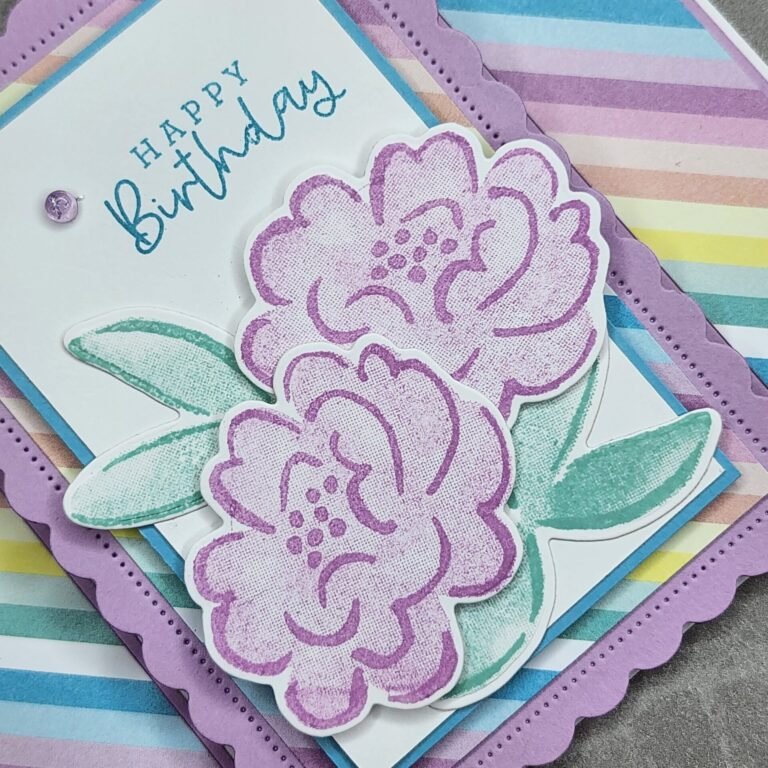
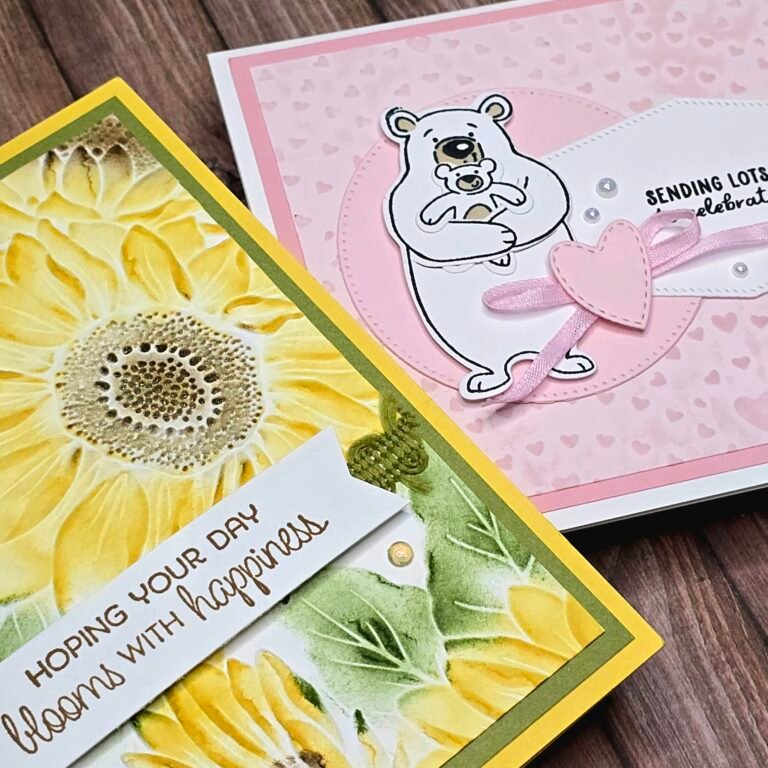
Hello and happy Monday! This week I have chosen the Stampin’ Up! Easter Bunny bundle to be my featured product of the week. Let’s kick it off with a fun fold!
As of this morning this adorable bundle was on the low inventory list. So if you are wanting to add this to your collection in time for Easter I wouldn’t wait too long, it could be sold out very quickly. To purchase it through my online store now just click HERE.
This adorable Easter Bunny Z-Fold card is on of the three cards that we will be making together in my Happy Hostess monthly club. I just love how cute and adorable these Easter Bunnies are. Of course they make great Easter cards but they would also make for some great spring themed cards too! I can even visualize some pretty spectacular scrapbook pages made with this fun bundle! For today’s card I have paired it with the sale-a-bration exclusive Dandy Designs Designer Series Paper (Free with $120 CDN order). If you would like to make this card for yourself, I have all of the directions and measurements in the Let’s Make It section below. Have fun and Happy Stamping!
Let’s Make It!
To create the card base cut Fresh Freesia cardstock 8-1/2 x 5-1/2 and score at 2-1/8 and 4-1/4
Fold the Fresh Freesia card base in half on the 4-1/4 score line and fold back on the 2-1/8 score line to create a z-fold
Open the card and adhere the two strips of 1-7/8 x 5-1/4 Dandy Designs DSP to each of the smaller panels
Stamp the front facing bunny with Basic Gray ink in the bottom left corner of the Basic White 4 x 5-1/4 insert, colour with Stampin’ Blends and adhere to the inside of the card
Emboss the 2-3/4 x 3-3/4 piece of Basic White with the Raindrops folder and layer on to the Fresh Freesia cardstock. Attach this piece to the Pear Pizzazz cardstock with stampin’ dimensionals
With adhesive just along the left hand side attach the Pear Pizzazz cardstock to the folded card front
Stamp the grass all along the bottom of the 3/4 strip of Pear Pizzazz cardstock with Old Olive ink and fussy cut along the top – adhere to the bottom of the raindrop embossed piece with dimensionals
On the 2-1/2 x 3-1/2 Basic White stamp the right-facing bunny and easter eggs with Basic Gray ink, fussy cut the easter eggs and punch the bunny out with the coordinating Easter Bunny punch
Colour the images and attach to the card front with stampin’ dimensionals
Make a pointed end on the 3/4 strip of Basic White using the Banners Pick-a-Punch, stamp Happy Easter with Basic Gray and attach above the bunny with dimensionals – add a Milky Dot at the pointed end
Stampin’ Up! Products Used For The On The Farm Notecards
You can purchase Stampin’ Up! products from my online store from anywhere in Canada, I would love to have you shop with me! To see more details of any of the products in this list just click on the image!
Earn customer loyalty tokens for each $10 increment of your online order … collect and redeem for free Stampin’ Up! product!! If you have any questions about ordering or need a little help to place your order please contact me … I am happy to help!
Hello and welcome Stampin’ Friends! Today I want to share with you the great fun fold card that I created during my Tutorial Tuesday Facebook Live last night. I am featuring the On The Farm bundle and Day At The Farm Designer Series Paper all week long here on the blog. Have you added this adorable bundle to your collection yet? Click HERE to add it to your order today … you will be so happy that you did! Plus when you order this bundle you can chose the Day At The Farm Designer Series Paper as your FREE sale-a-bration product!
If you would like to create this fun fold On The Farm card yourself just scroll on down to the Let’s Make It section of this post. Click the play button to watch the tutorial replay. Measurements and cutting guide are all mentioned in the video. At the end of this post you will also find a visual list of all of the Stampin’ Up! supplies used to create this On The Farm card. Simply click on any of the images to view them closer or purchase them from my online store. Remember to use the current host code (KF2EWNAJ) when you order online to earn customer loyalty tokens on your order!
Thanks for popping in, have a fabulous day and Happy Stamping!
Let’s Make It!
Below is the video replay of the Facebook Live to create this card. If you like the video please subscribe to my YouTube Channel and leave me a comment. I love to hear from you!
Stampin’ Up! products I used on today’s card
You can purchase Stampin’ Up! products from my online store from anywhere in Canada, I would love to have you shop with me! To see more details of any of the products in this list just click on the image!
Earn customer loyalty tokens for each $10 increment of your online order … collect and redeem for free Stampin’ Up! product!! If you have any questions about ordering or need a little help to place your order please contact me … I am happy to help!
Hello stampin’ friends! Today I want to share with you the Share A Milkshake Valentine’s Day Card I created in my Tutorial Tuesday Facebook live last night. I just adore these sweet milkshakes! During the live video I shared a few little tips on how to maximize your fine shimmer paper and how to successfully use blending brushes for creating nice subtle colour.
The Share A Milkshake bundle is perfect for Valentine’s Day but can be used for so much more too! You can have a ton of fun making cards for birthdays, anniversaries and so much more! To purchase your Share A Milkshake bundle click here and order it today! When you do you’ll earn both my customer loyalty tokens AND a free sale-a-bration item of your choice!
If you would like to recreate this sweet Valentine’s Day card yourself just scroll on down to the Let’s Make It section of this post. Just click on the play button to watch the tutorial replay and the measurements are written there for you too!. I have also included a complete supply list at the end of the post to make shopping for these supplies nice and easy for you!
Thanks for popping in, have a fabulous day and Happy Stamping!
Let’s Make It!
Click on the play button in the video image and catch the replay of last night’s Tutorial Tuesday live video.
Measurements:
Sweet Sorbet card base 4-1/4 x 11 scored at 5-1/2 and scrap for cutting out the hearts
Country Floral Lane DSP: 4 x 5-1/4 and 3/4 x 4
Fine Shimmer Paper (Soft Succulent) 3-3/8 x 4-5/8
Balmy Blue 1 x 2-1/4
Basic White 3-1/4 x 4-1/2, 4 x 5-1/4 and large scrap for stamping milkshake pieces
Supplies:
All of the products used in creating today’s project can be purchased through my online store from anywhere in Canada. There is a complete list of the products, with clickable links, at the end of this post for you!
Stampin’ Up! products I used on today’s Share A Milkshake card
You can purchase Stampin’ Up! products from my online store from anywhere in Canada, I would love to have you shop with me! Click on any of the items below to see it in my online store ? If you have any questions about ordering or need a little help to place your order please contact me … I am happy to help!
Hello and Happy Friday the 13th! Today I am sharing a gorgeous Z-fold Anniversary card that I created with the Stampin’ Up! Country Bouquet bundle. This fun-fold style is super easy … you can find the step-by-step instructions a little lower down in this post.
I have enjoyed creating with the Country Floral Lane Suite Collection this week. For today’s card I challenged myself to step away from the colour palette of the Country Floral Lane DSP and went with my favourite current colour, Polished Pink. I’ve paired it up with Mint Macaron and a little Pool Party in the ribbon to create something very pretty! If you would like to add the Country Bouquet bundle to your stamp collection please head to my online store and get yours today! You’ll be creating all kinds of heartfelt cards in no time!
Country Bouquet was the stamp I featured in my Stamp of the Month club for January. If you would like some more inspiration using this stamp set you can watch the tutorial I did for my club members over on my YouTube Channel.
Thanks for popping in today. I hope you have a wonderful day and a creative weekend! Happy Stamping ❤️
Let’s Make It!
Start with a 4-1/4 x 11 Polished Pink card base scored at 2-3/4 and 5-1/2 and folded to create the Z fold
Open the card and attach a 2-1/2 x 4 piece of Mint Macaron cardstock to each of the two smaller sections, then adhere a 2-1/4 x 3-3/4 piece of Mint Macaron Country Gingham Designer Series Paper on to both
Attach a 4 x 5-1/4 piece of Mint Macaron cardstock to the larger back flap (inside of the card)
Cut a 3 x 3 square of Basic White cardstock, fold the card closed and adhere half of the square to the front small flap * be mindful not to get adhesive beyond the scored line or your z-fold will not work
Die cut a stitched square (2-3/4) out of Basic White cardstock using the Stylish Shapes dies
With Polished Pink ink, stamp the ‘for you’ from the Country Bouquet stamp set in the bottom right corner of the stitched square
Stamp the two-step large heart on to the stitched square starting with the floral stamp with Polished Pink and the leaves stamp with Mint Macaron
Wrap a piece of Pool Party Grosgrain ribbon across the square just above the ‘for you’ and attach at the back, then adhere the stitched square to the white square on the card with stampin’ dimensionals
Using the Country Bouquet punch, cut out the two hearts from Polished Pink DSP in the 2021-2023 In-Color 6×6 collection and adhere over the ribbon with stampin’ dimensionals
Tie a bow with the Pool Party Grosgrain ribbon and attach with a mini glue dot to the left of the cut out hearts and add a couple of Milky Dots below
For the inside cut a 3-3/4 x 5 piece of Basic White and stamp ‘just wanted to say…’ and the two small hearts from the Country Bouquet stamp set in the center – then add the ‘Happy Anniversary’ stamp from the Celebrating You stamp set with Mint Macaron ink * when the card is closed the inside greetings should be covered by the white square on the card front
Stampin’ Up! products I used on today’s card
You can purchase Stampin’ Up! products from my online store from anywhere in Canada, I would love to have you shop with me! To see more details of any of the products in this list just click on the image!
Earn customer loyalty tokens for each $10 increment of your online order … collect and redeem for free Stampin’ Up! product!! If you have any questions about ordering or need a little help to place your order please contact me … I am happy to help!
Welcome, it’s nice to see you! Today wraps up the Glad We’re Friends stamp set sharing week. I hope that you have enjoyed seeing these projects as much as I have enjoyed creating them for you! If you missed the other posts this week just click here to see them!
The adorable Glad We’re Friends stamp set can be found in the 2022-2023 Stampin’ Up! Annual Catalogue on page 51 or here on my online store. Purchase yours today so you can get to creating some really fun & adorable cards to share with your loved ones.
I have included the instructions in the “Let’s Make It” section of today’s post if you would like to recreate this easy Z-Fold card. I love creating quick and easy fun-fold cards and this one turned out so sweet ❤️. At the end of today’s post there is a list of all of the products that I used in making this Sweet Gingerbread card so be sure to check that out if you see something that you like!
Thank you for stopping in today … have a wonderful crafty weekend! Happy Stamping!
Signature
Let’s Make It! Glad We’re Friends Z-Fold Card
Start with a piece of Blackberry Bliss cardstock that measures 8-1/2 x 5-1/2 and score it on the long edge at 2-1/8 and 4-1/4, fold on the score lines to create the Z-Fold
On a 3-7/8 x 5-1/8 piece of Basic White stamp with Tuxedo Black the sentiment I’m Blown Away By You! in the center and attach to a 4 x 5-1/4 piece of Pool Party cardstock then attach to the inside of your card
Cut two strips of Design A Daydream, different patterns, to 1-7/8 x 5-1/4 and attach to each of the smaller card panels
On a 3-1/4 square piece of Basic White cardstock, stamp the puppy and fan image from the Glad We’re Friends stamp set, in the upper half with Tuxedo Black Memento ink and colour with Stampin’ Blends
Attach the stamped piece to a 3-3/8 square panel of Blackberry Bliss cardstock and then to a 3-1/2 square piece of Pool Party cardstock
Close the card and attach the layered stamped piece to the front flap – be mindful to only get the adhesive on the flap portion so that you don’t end up gluing your card shut
Stamp the ‘gald we’re friends’ sentiment on a 1/2″ strip of Basic White cardstock with black ink and attach below the puppy using stampin’ dimensionals
From the Design A Daydream paper, fussy cut three pinwheels in three different colours, attach two to the front of the card as shown and the remaining one to the inside
Add a single rhinestone to the center of each pinwheel to complete the card
Stampin’ Up! products I used on today’s card
You can purchase Stampin’ Up! products from my online store from anywhere in Canada, I would love to have you shop with me! Click on any of the items below to see it in my online store ? If you have any questions about ordering or need a little help to place your order please contact me … I am happy to help!
Hello and welcome stampin’ friends! My project today is a fun fold Christmas card using I created with the Sweet Gingerbread stamp set. This is the project that I shared on my Facebook Live Tutorial Tuesday this week over on my Birdsnest Designs Facebook page.
Creating this card with all of these bright and fun colours was a blast! it is always so amazing what you can create with just ink, stamps and paper! Of course there is that addition of the sparkly ribbon and rhinestones to give it some Christmas sparkle too.
The Sweet Gingerbread stamp set and all of the other Stampin’ Up! products can be found in my online store. Shop from the comfort of your home from anywhere in Canada!!
If you would like to watch the video tutorial or see the complete list of products that I used in creating this fun fold card just keep on scrolling through today’s post, it’s all here for you!
Thanks for stopping in, it was so nice to see you!
Sweet Gingerbread Fun Fold Card Tutorial
Click play on the video thumbnail and come join me in my craft room, together we can stamp and create this adorable Sweet Gingerbread fun-fold card!
If you enjoy the tutorial please leave me a comment and subscribe to my YouTube channel … I love sharing crafty inspirations with you!!
Cardstock Measurements:
Bermuda Bay: 4-1/4 x 5-1/2 and 4 x 5-1/4
Parakeet Party: 3-1/4 x 4-1/4
Basic White: 4 x 9 scored at 3 and 6
Crumb Cake: 1 x 2-1/4
Stampin’ Up! products I used on today’s card
You can purchase Stampin’ Up! products from my online store from anywhere in Canada, I would love to have you shop with me! Click on any of the items below to see it in my online store ? If you have any questions about ordering or need a little help to place your order please contact me … I am happy to help!