• My account
  • Cart
  • Checkout
  • Nav Social Menu

    • Facebook
    • Instagram
    • Pinterest
    • YouTube

Birdsnest Designs | Denise Cox

  • Home
  • Blog
  • PDF Tutorials
  • Shop
    • Shopping Perks & How To
    • Full Online Store
    • Online Exclusives
    • New Products
    • Product Suites
  • Join My Team
    • Join the Birdsnest Stampers Team!
    • About the Starter Kit
    • Buy Your Starter Kit
  • Clubs & Classes
    • Creatively Hatched Monthly Card Class
    • Current Class
  • Catalogues
  • Contact Me

Happier Than Happy: Christmas In July

15 Jul
Happier Than Happy: Christmas In July via @denise34

Hello stamping friends and welcome!  It’s Friday which means it’s also Christmas in July on the blog! Today’s card wraps up my weekly share of the sweet Happier Than Happy stamp set and Happy Forest Friends Suite.   I got creative using a handful of Stampin’ goodies to meet today’s fun Christmas card challenge. There’s a full list of all of the supplies I’ve used down at the bottom of the post and step by step instructions too!

Let me say that I am loving this Christmas in July Friday challenge.  It has me looking at my supplies in a whole different way … I love it!!

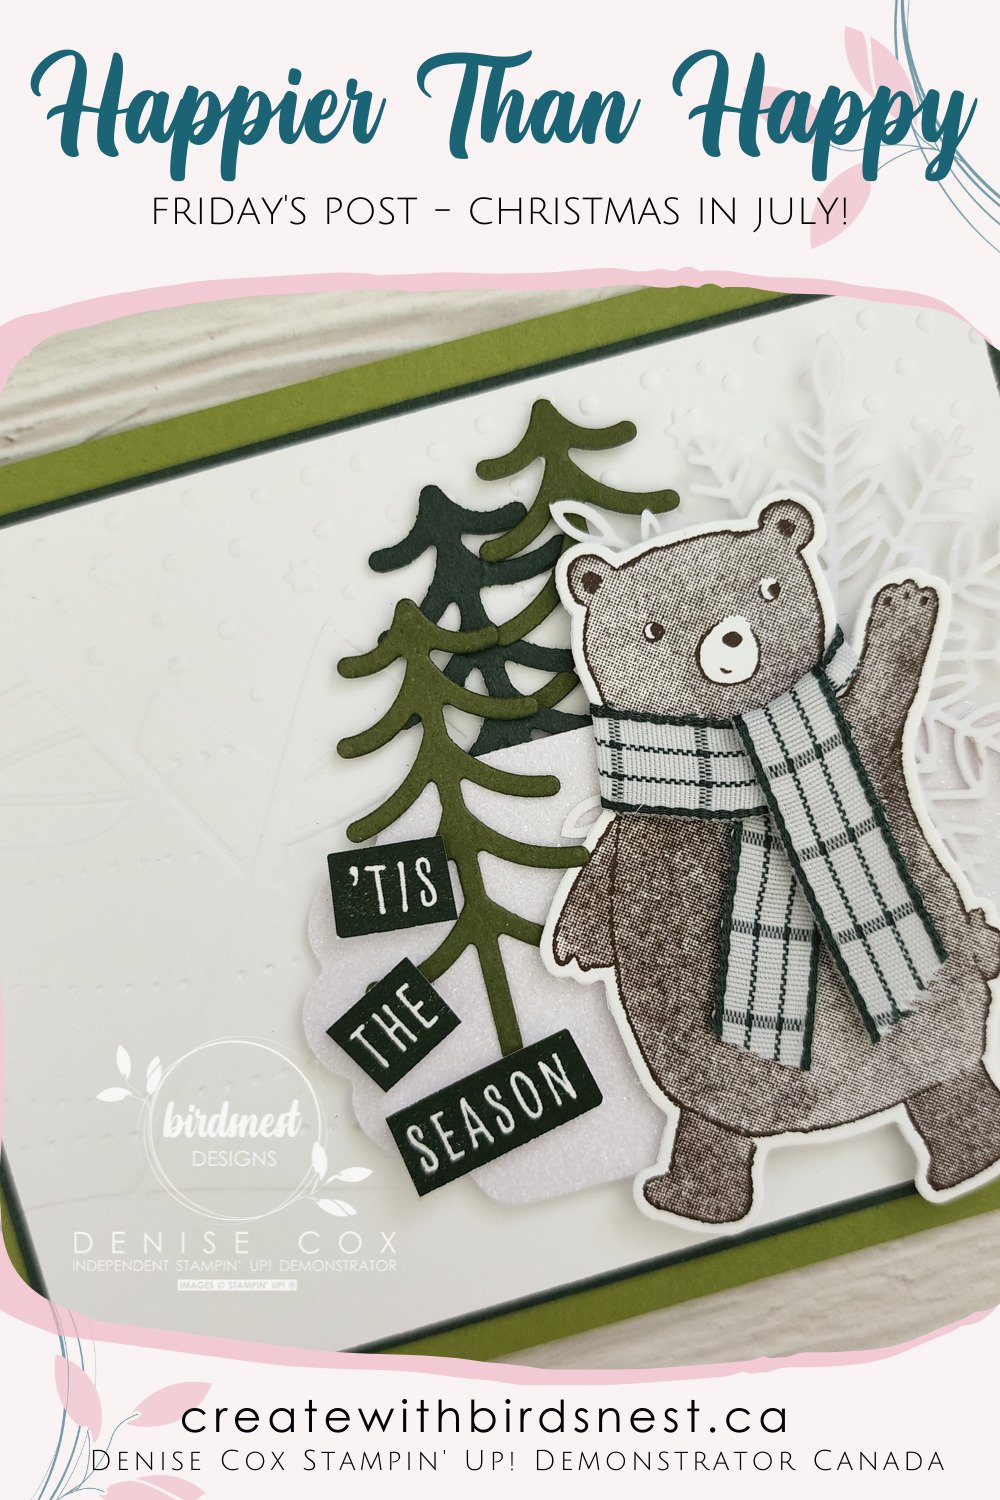
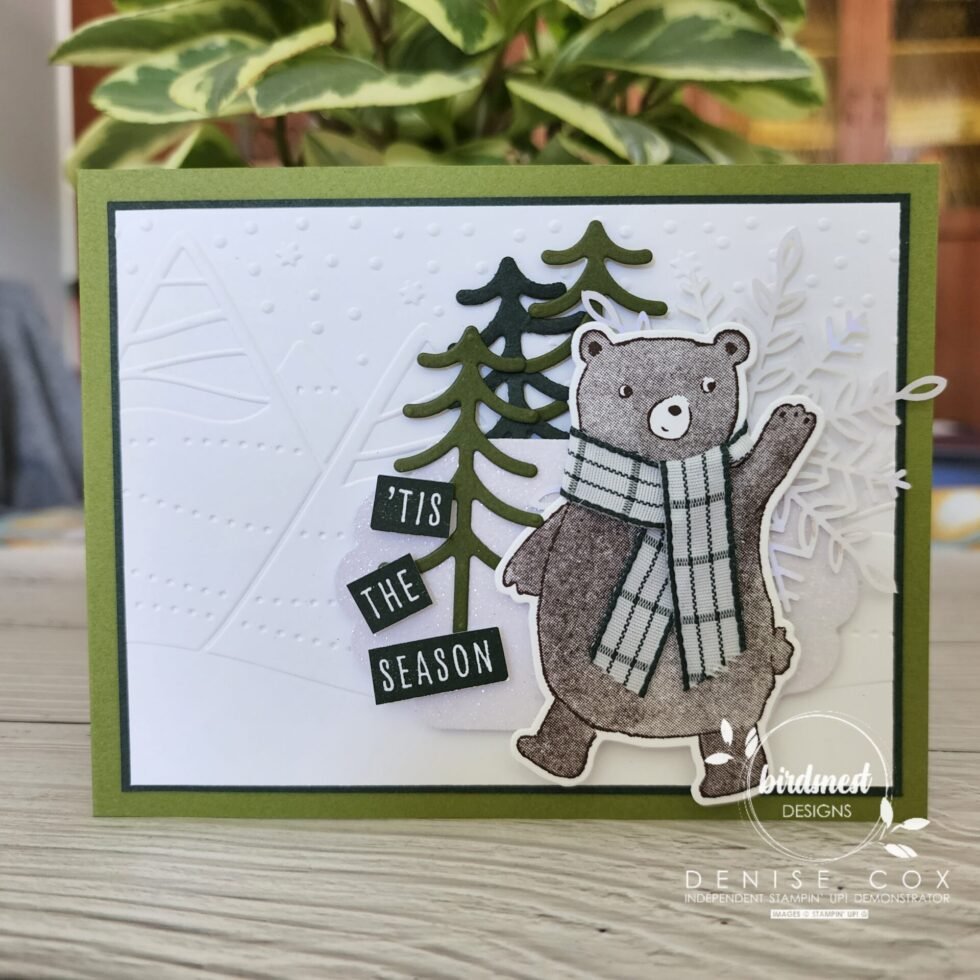
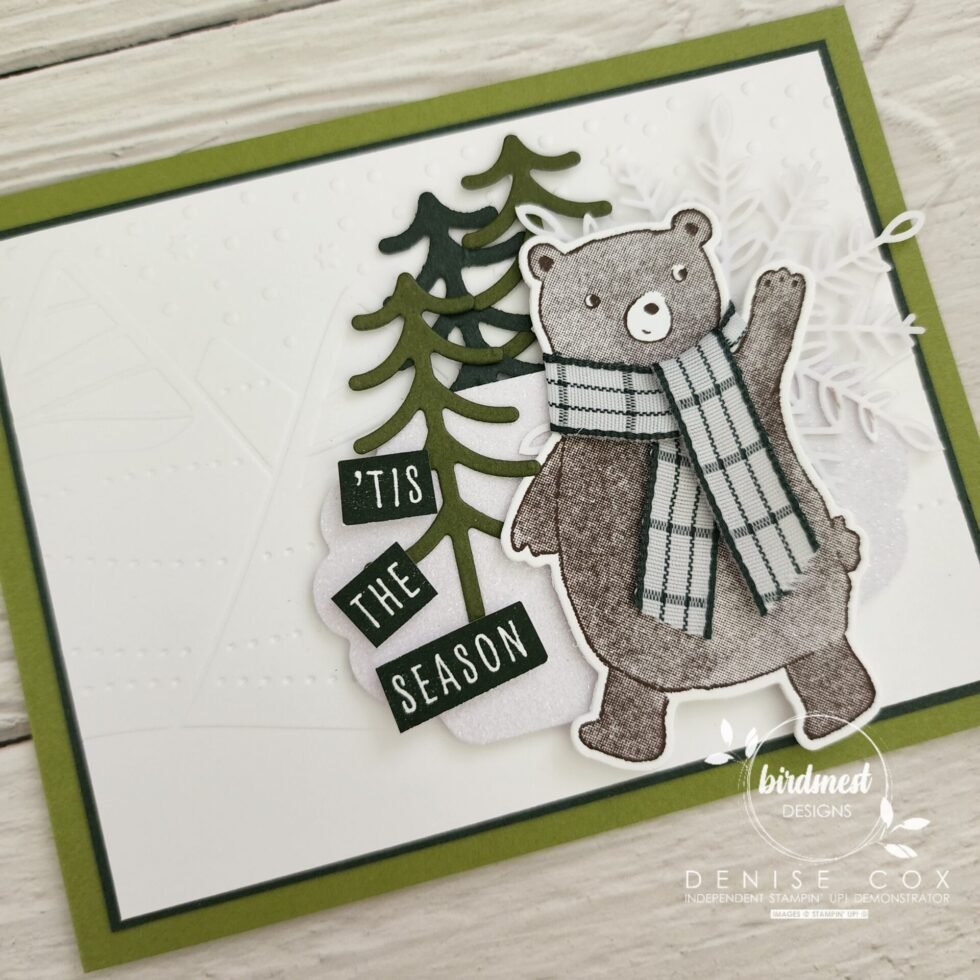
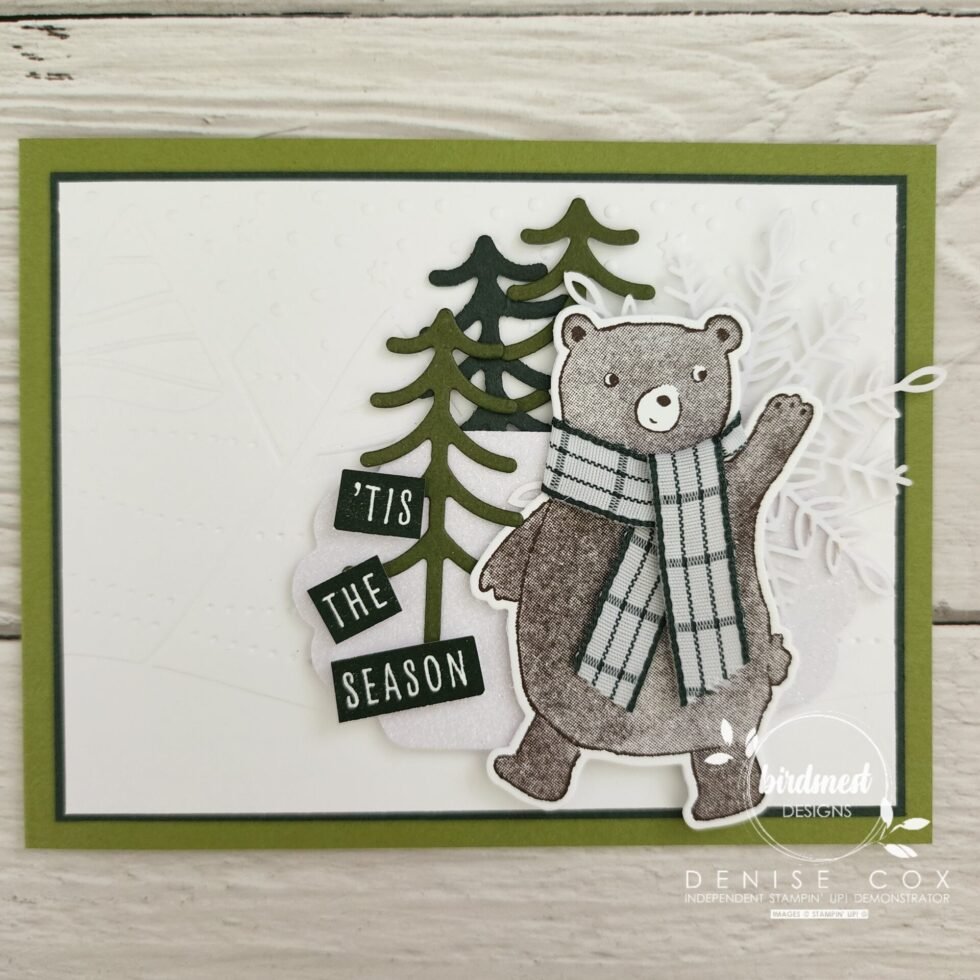
When I looked at the Happier Than Happy stamp set and thought Christmas, the first thing that came to mind was a scarf for the darling little bear.  So that’s where I started.  It got me off to a great start and then I started finding all kinds of other elements to add in!!  I had so much fun!!

If you like today’s card and the Happy Forest Friends Suite please leave me a comment below.  I’d love to hear from you!!

Let’s Make It: Happier Than Happy Christmas Card

  1. Start by cutting an Old Olive card base to 8-1/2″ x 5-1/2″ and score it in half at 4-1/4″  then fold on the score line
  2. Next cut a piece of Evening Evergreen cardstock to 5-1/8″ x 3-7/8″ and adhere to the center of your card front
  3. Emboss a piece of 5″ x 3-3/4″  Basic White cardstock using the mountain folder included in the Charming Landscapes embossing folder pack, and adhere it to the Evening Evergreen cardstock
  4. Stamp the bear using Early Espresso ink on Basice White cardstock and cut it out with the coordintating die
  5. Take a piece of Evening Evergreen 3/8″ Windowpane Check ribbon (about 6″) and wrap it around the bear’s neck to create a scarf, adhere it in place with Mini Glue Dots
  6. Using the tree from the Happy Forest dies cut out two in Mossy Meadow and one in Evening Evergreen
  7. Die cut the label from the Seasonal Label dies using a piece of white glimmer paper
  8. Stamp the ‘Tis the Season greeting from the Christmas to Remember stamp set with Evening Evergreen ink and cut the words apart 
  9. Now to create the focal point with all the layers:
    • Attach two die cut trees directly to the embossed piece on your card front
    • Using dimensionals, attach the label covering the bottom portion of the trees
    • Adhere a Wonderful Snowflake to the top-right of the label
    • Pop the bear on top of the glittery label using dimensionals
    • Adhere the last die cut tree to the left of the bear
    • Add the sentiment pieces using mini dimensionals
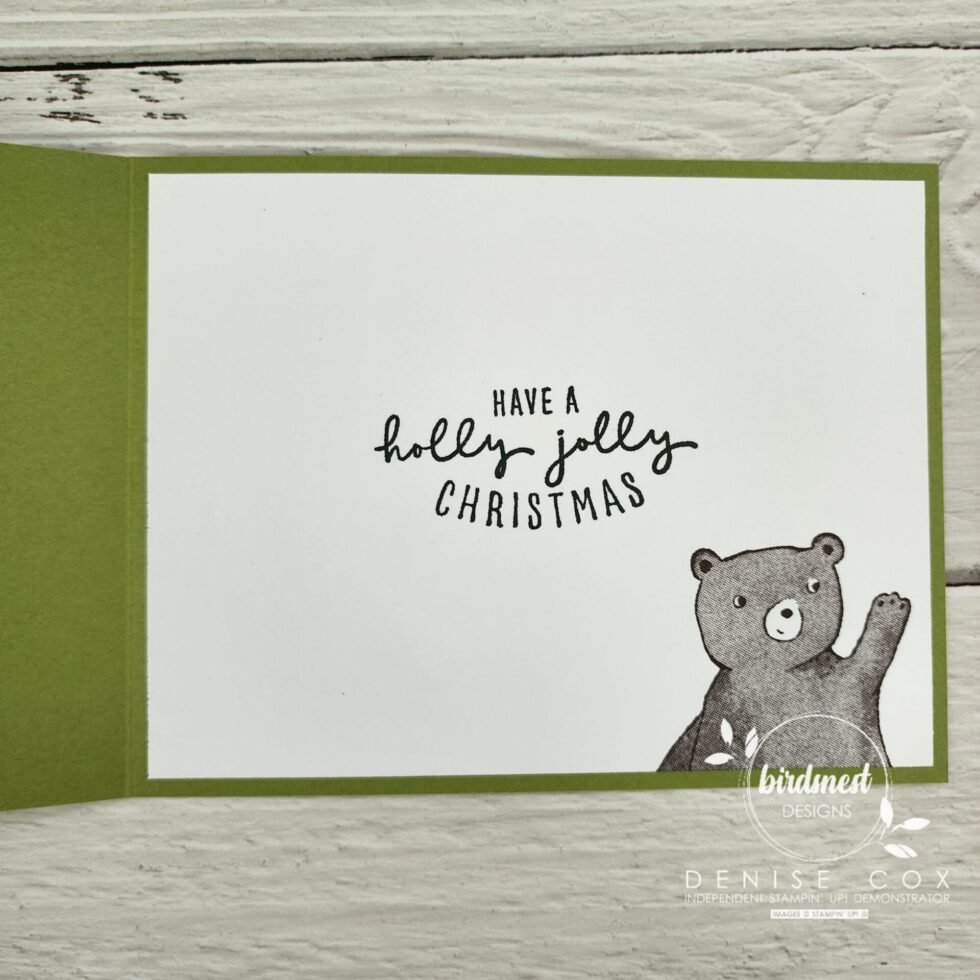
  10. Now to let’s show some love to the inside of the card using a 4″ x 5-1/4″ piece of Basic White cardstock
    • Stamp the Have a holly jolly Christmas greeting from Christmas to Remember in the center with Evening Evergreen ink
    • Stamp the top part of the bear in the bottom right corner with Early Espresso ink
    • Adhere to the inside of the card

To check out the other projects that I shared this week using the Happier Than Happy stamp set just click the images below ?

Keep in mind that for July and August we are having another fabulous Sale-a-Bration at Stampin’ Up!  That means you can get FREE product with each $60 order!  If you would like to place an order from anywhere across Canada please visit my online store.  I would love to have you shop with me ❤.

I hope that you have enjoyed today’s post and the card I created with my Christmas in July Friday challenge.  Thank you so much for stopping by and remember, my online store is open 24/7, seven days a week to purchase your Stampin’ Up! goodies.  Shop with me anytime from anywhere in Canada.  

Denise Cox Stampin' Up! Demonstrator Canada

List of Stampin’ Up! Goodies used on the Happier Than Happy Christmas Card

Happier Than Happy Bundle (English)
[158952]
$66.50
Christmas To Remember Cling Stamp Set (English)
[156300]
$32.00
Seasonal Labels Dies
[156299]
$52.00
Wonderful Snowflakes
[156340]
$8.25
Real Red & White 6
Real Red & White 6″ X 6″ (15.2 X 15.2 Cm) Glimmer Paper
[159578]
$7.00
Evening Evergreen 3/8'' (1 Cm) Windowpane Check Ribbon
Evening Evergreen 3/8” (1 Cm) Windowpane Check Ribbon
[158135]
$10.25
Charming Landscapes Embossing Folders
[159593]
$11.00
Early Espresso Classic Stampin' Pad
Early Espresso Classic Stampin’ Pad
[147114]
$11.00
Evening Evergreen Classic Stampin' Pad
Evening Evergreen Classic Stampin’ Pad
[155576]
$11.00
Old Olive 8-1/2
Old Olive 8-1/2″ X 11″ Cardstock
[100702]
$12.75
Evening Evergreen 8 1/2
Evening Evergreen 8 1/2″ X 11″ Cardstock
[155574]
$12.75
Mossy Meadow 8-1/2
Mossy Meadow 8-1/2″ X 11″ Cardstock
[133676]
$12.75
Basic White 8 1/2
Basic White 8 1/2″ X 11″ Cardstock
[159276]
$14.00
Mini Glue Dots
Mini Glue Dots
[103683]
$7.25
Mini Stampin' Dimensionals
Mini Stampin’ Dimensionals
[144108]
$6.00
Stampin' Dimensionals
Stampin’ Dimensionals
[104430]
$6.00
Multipurpose Liquid Glue
[110755]
$5.50
Mini Stampin' Cut & Emboss Machine
Mini Stampin’ Cut & Emboss Machine
[150673]
$86.00

Love this post? Please share!

Share
Pin755
Post
Email


Filed Under: Cards, Project Gallery Tagged With: Cardmaking, Charming Landscapes, christmas, Christmas in July, Happier Than Happy, Happy Forest Friends

Previous Post: « Happier Than Happy Fun Fold Card
Next Post: Adventurous Birthday Wishes with the Tree Lot Dies »

Primary Sidebar

Meet Denise

Hi there! I’m Denise Cox—welcome to my crafty corner of the internet! I live in Saskatchewan, Canada with my husband Brandon, and a house full of furry love—our two dogs, Linus and Lucy, and our cats, Cleo and Chloe. I’ve been passionate about paper crafting for as long as I can remember and was introduced to Stampin’ Up! back in 2009. After falling in love with the products, I joined as a demonstrator the following year—and I’ve never looked back! I love sharing beautiful projects and helping others discover their creativity. Thanks for stopping by—I’m so glad you’re here!

  • Facebook
  • Instagram
  • Pinterest
  • YouTube
Stampin' Up! 2025-2026 Annual Catalogue
May 6 2025 - May 4 2026
View Online | Shop Online

Sign up to receive my newsletter, blog posts, or both, delivered right to your inbox! Each contains creative inspiration, all the latest news and promotions.

Thank you!

Check your inbox for further instructions.

.

Footer

Important Links

  • Home
  • Blog
  • Shop
  • Buy the Starter Kit
  • Contact Me
  • About Me
  • Privacy Policy

  • Facebook
  • Instagram
  • Pinterest
  • YouTube

Sign up to receive my newsletter, blog posts, or both, delivered right to your inbox! Each contains creative inspiration, all the latest news and promotions.

Thank you!

Check your inbox for further instructions.

.
All content on this blog is the property of Denise Cox, Stampin' Up!® Independent Demonstrator. Classes, services and projects offered here are not endorsed by Stampin' Up!® Projects, videos, photos, ideas and articles are shared for personal use only and may not be removed, duplicated or copied without permission

Copyright © 2025 Denise Cox & Birdsnest Designs · Theme Customisation by Catherine Carroll · Privacy Policy

755